Get in Touch with Engelhardt


Your question about how to bond rubber to metal actually has three answers: it depends on your volume of production, the compound involved, and the environment in service. Permanent bonds are best achieved by vulcanization, small repairs or batch work may be economical with adhesive bonding, and field replacements are best serviced by mechanical fastening. This paper will discuss all three processes with specific recommendations of adhesives, procedure steps and test standards derived from a lifetime of manufacturing experience.
📐 Quick Specs
| Bonding Methods | Vulcanization · Adhesive · Mechanical |
| Key Standard | ASTM D4²9 (8 test methods, A through H) |
| Bond Strength | Vulcanized bonds achieve 100% rubber tear — the rubber fails before the bond does |
| Vulcanization Temp Range | 140–²00°C (284–392°F) |
Why Rubber-to-Metal Bonds Fail
Most rubber-to-metal bond failures can be traced to one of four fundamental issues: using the wrong adhesive for the substrate, improper coating of inserts, process errors during cure, and environmental deterioration of bond quality. Recognizing these failure modes before production begins prevents rework and scrap.
Research conducted by the Royal Socity in 2025 published in Nature showed that after 10-10 cycles in harsh environments with salt spray or aggressive fluids attacking the metal, adhesion experienced a 35-50 percent reduction. At the key seal interface, fiber stress fibers achieved 30-50 MPa high enough to induce peel separation if the bond was weak prior to seal installation.
Contamination is the most under-appreciated factor in rubber to metal bonding. The natural and greasy oils on uncoated inserts inhibit adhesive wetting requiring degreasing to maximize bond. An industry expert simply stated, “We had perfect bonding for years, then a new employee started handling parts without gloves – rejection rates increased overnight from 2% to 40%.”
⚠️ Top 3 Failure Causes
- Contaminated metal surface (fingerprints, residual mold release agents)
- Incorrect adhesive system for the substrate (Primer on silicone rubber)
- Incorrect cure temperature or insufficient cure time during vulcanization
Three Methods to Bond Rubber to Metal

Choosing between vulcanization, adhesive bonding, and mechanical attachment comes down to production volume, processing costs, and whether the joint requires disassembly. Below are all three methods with supporting data:
| Method | Bond Strength | Best For | Temp Range | Cost/Part |
|---|---|---|---|---|
| Vulcanization | Rubber tears before bond breaks | Production >100 pcs | 140–200°C | $2–15/part at volume |
| Adhesive Bonding | 10–41 N/mm² shear | Repairs, small batch | Room temp–150°C | $0.50–5/part |
| Mechanical Fastening | Clamping force dependent | Field repairs, disassembly needed | N/A | $1–10/part |
Decision framework:
- engine and gearbox mounts, vehicle suspension bushings, isolation mounts that must carry weight but avoid transmission of vibration engineers choosing vulcanization
- existing assembly elements in need of repairs, small batch production of less than 50 parts, repairs in high dilutions choosing adhesives
- access for service or adjustment requires removal of the joint, will not carry weight choosing mechanical fasteners
Process engineers making tooling decisions can use our adhesive bonding process calculator to estimate per-part costs based on expected annual volume:
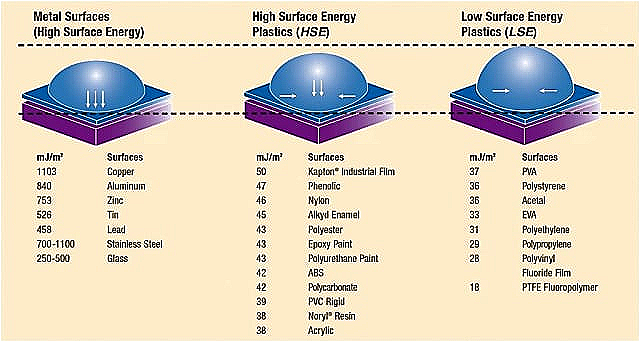
How to Choose the Right Rubber-to-Metal Adhesive
Picking the best glue for rubber to metal requires matching the type of rubber, service environment, and mechanical load profile (static versus dynamic). Here are five proven chemistries with specific products and test data:
| Adhesive Type | Examples | Shear Strength | Cure Time | Best For |
|---|---|---|---|---|
| Cyanoacrylate (Superglue) | Loctite 480, ASI RP | 10–20 N/mm² | Seconds | Small parts, EPDM/neoprene |
| Two-Part Epoxy | 3M Scotch-Weld | 20–30 N/mm² | 1–24 hours | Structural, high-temp |
| Contact Cement | Pliobond 25, 3M 1300 | 3–8 N/mm² | 15–30 min | Large areas, flexible joints |
| Silicone Adhesive | Sikaflex 221 | 2–5 N/mm² | 24–48 hours | Silicone rubber, sealing |
| Polyurethane | 3M 5200 | 8–15 N/mm² | 7 days | Marine, outdoor exposure |
Select the adhesive chemistry to match the application. The rubber series is listed across the top, while the ideal static shear and peel strength values are across the bottom:
Start by matching the adhesive chemistry to your rubber compound. Our elastomer compound selector cross-references elastomer and adhesive types to identify which combinations hold up under service conditions:
Can You Use Gorilla Glue to Bond Rubber to Metal?
Gorilla Glue uses a polyurethane adhesive, which foams and cures with a significant amount of expansion. This expansion opens up portions of the bondline, decreasing the total surface area of rubber-to-metal adhesion. For not load critical applications – like bonding a rubber bumper to the lid of a toolbox it is serviceable. It is an unreliable choice for load-bearing joints where rubber bonded to metal must form a strong bond — the uncontrolled bondline thickness and bubble entrapment weaken the joint. Choose a dedicated glue for rubber formulated for this purpose.
“The biggest mistake we’re seeing is engineers choosing an adhesive based on shear strength alone. Peel resistance, elongation, and temperature all play a part in deciding the right rubber-metal adhesive as well—sometimes more!”
– Mark Thielen, Senior Applications Engineer, LORD Corporation ( now part of Parker Hannifin)
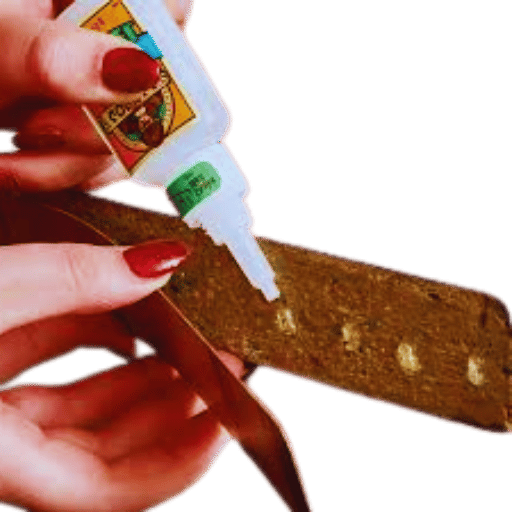
Step-by-Step: How to Bond Rubber to Metal with Adhesive

This is a general procedure for post-mold adhesive bonding of cured rubber to a metal part using a room-temperature or heat-activated adhesive. Follow each step sequentially; neglecting surface prep is the single most common cause of bond failure.
- Clean the metal substrate
Degrease the metal surface with solvent (MEK, acetone, or isopropyl alcohol). For critical bonds, follow with aluminum oxide grit blasting at 60-80 psi for a surface profile of 1.5-3.0 mils.
Pro Tip: Water break test the metal surface after cleaning: pour distilled water onto the piece. If the water runs evenly without beading, the surface is clean. Beading is a sign of residual oil contamination.
- Prepare the rubber surface
Wipe the rubber down with acetone to remove mold release agents, process oils, or bloom. Lightly abrade aged rubber with 120 grit sandpaper to create a fresh surface. Wait for the solvent to flash off (2-5 minutes). - Apply primer
Apply primer to the metal surface with either brush, spray, or dip. Aim for a 0.2-0.4 mil dry film thickness. Wait until the primer feels tacky before continues (at room temperature this is normally 15-30 minutes).Pro Tip: If any part of the bond area remains unprimed, this is a weak spot that may crack under repeated cycle loading.
- Apply adhesive
Apply the adhesive over the primer with a brush, spray, or dip. Aim for a 0.5-1.0 mil dry film coat. Mix two-part adhesives according to manufacturer instructions, and apply before the pot life finishes. - Assemble and clamp
Using even, firm pressure press the rubber to the metal surface. Clamp, fixture, or press with pneumatic pressure. Avoid their use any trapped bubbles because these will weaken the bond, starting in the center and working out. - Cure per adhesive specifications
Is the adhesive heat or room temperature cured? If cold cured: wait 24-72 hours for final strength. If heat cured, follow manufacturer’s time-temperature curing profile exactly. Do not load the joint until the adhesive is fully cured.
Will Epoxy Bond Rubber to Metal?
Yes — two-part epoxy delivers 20–30 N/mm² shear strength and bonds most rubbers (except silicone) to metal. One major drawback is rigidity: under thermal cycling or vibration, the stiff epoxy-rubber bondline cracks while the rubber stays intact. For dynamic applications that need long service life, a modified flexible epoxy or urethane adhesive handles repeated movement without fracturing.
⚠️ Real-World Scenario: Skipped Degreasing
Time was saved during an operation, as a machine operator bonded rubber pads to steel brackets skipping the solvent degreasing procedure. The adhesive curedand the parts success fully withstood initial pull testing. After 3 weeks of vibration loading on the production line, 60% of the bonds delaminated. A brief period of residual stamping oil had prevented complete adhesive wetting of the metal surface. Re-assembly caused two shop days of lost production.
Surface Preparation — The Step That Determines Bond Strength
More than 80% of bond strength or failure hinges on the state of the prepared substrate. No adhesive or vulcanization system will compensate for a poorly prepared surface. Every contaminant must come off, and the surface profile must offer a mechanical grip for the adhesive to anchor into.
Preparation checklist:
- Solvent degreasing – Wipe or vapor degreasing with MEK, acetone, or trichloroethylene. Removes oils, fingerprints and machining fluids.
- Aluminum oxide grit blasting – Blast with 80-120 grit aluminum oxide at 60-80 psi. Forms 1.5-3.0 mil surface profile for mechanical attachment.
- Alkaline cleaning – For ferrous metals, an alkaline wash (pH 9-11) is used to remove heavy scale and corrosion products that grit blasting leaves behind.
- Water break test – Verify cleanliness by passing distilled water over the surface. Continuous sheeting = clean. Beading = contaminated, re-clean.
- Apply primer within 2 hours – Newly cleaned metal begins oxidization immediately. Bond within the window or re-prepare the surface.
- Wear nitrile gloves – Always handle prepared parts in sterile nitrile gloves. No contact with bare skin.
⚠️ Warning
Handling rubber coated inserts bare handed can cause bond failure. Skin oils leave an imperceptible barrier between adhesive and metal. A forum participant reports cleaning aluminum components with 409 household cleaner and hot water, and passing the water break test – an operational method for field use where industrial solvents are unavailable.
For rubber surfaces, remove all mold release agents by wiping with acetone or light abrasion. Molded rubber components receive a surface film of release agent during curing — a low-viscosity residue that prevents bonding. Remove it completely before applying any adhesive.
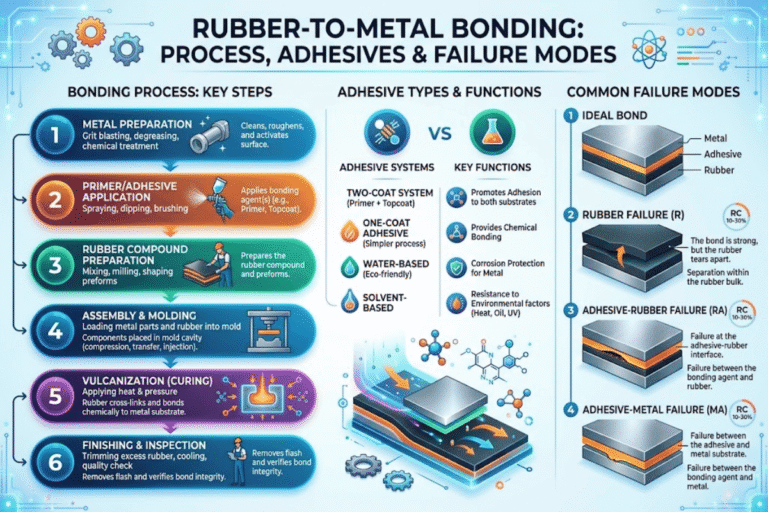
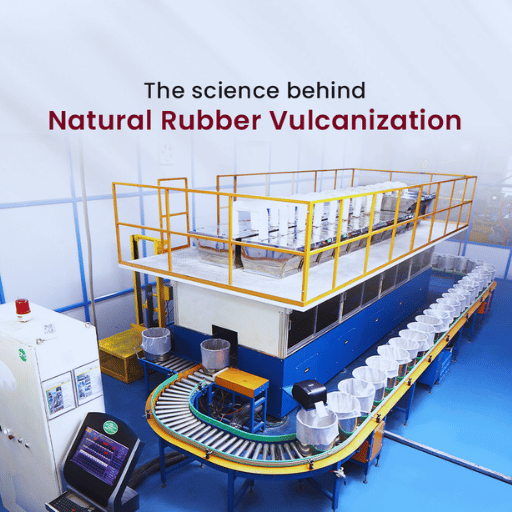
Vulcanization Bonding — The Industrial Manufacturing Standard
Vulcanizing rubber to steel or other metal substrates during the molding process creates the strongest bond possible between two dissimilar materials. During cure, rubber cross-links directly with the bonding agent applied to the steel insert, creating an interface that is more than capable of surpassing the tensile strength of the rubber. When tested to ASTM D429, true vulcanized bonds exhibit “100% rubber tear” – leading to the adhesive failing first.
The Two-Coat Adhesive System
In industrial vulcanization bonding, two coats are applied on to the insert prior to entering the mold:
- A primer coat (Chemlok-type or equivalent) bonds to the metal substrate. Dipped, sprayed or brushed on at 0.2-0.4 mil dry film thickness.
- Adhesive topcoat – bonds to the rubber compound during vulcanization. Applied over the dried primer at 0.5-1.0 mil dry film thickness.
Both coats must dry fully before placing the insert in the mold. Film thickness matters: too thin and the metal is exposed, creating air pockets that weaken the joint. Too thick and the adhesive layer itself becomes a failure point.
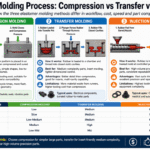
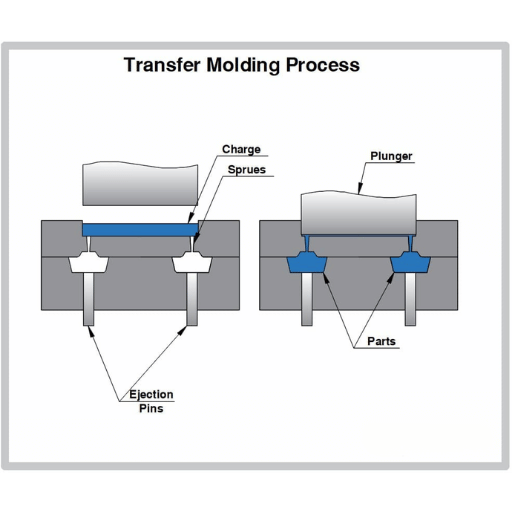
The Molding Process
Two primary methods produce vulcanized rubber-to-metal bonding parts:
- Transfer molding — uncured rubber is heated in a pot first, then forced under pressure through sprues into the mold cavity containing coated metal inserts. Mold temperature may reach 340F (171C). Typical cure is about 15 minutes.
- Rubber injection molding – rubber is injected at high pressure into a closed cavity. Provides faster cycle times and more consistent material properties than transfer molding, especially when complex geometries are involved.
Engelhardt’s rubber-to-metal bonding services employ both techniques, for the optimization of individual part geometries, volume production requirements, and rubber compound chemistries.
“There is no post-mold adhesive that matches the durability of a vulcanized bond. When the rubber cross-links with the bonding agent under heat and pressure, you get a molecular-level connection. The rubber literally becomes part of the metal assembly.”
– James Herold, Process Engineer, Parker Elastomer Process Materials
Lessons from the Production Floor
Pre-baking inserts causes failure: Some operators pre-bake coated metal inserts to “speed up” adhesive drying. This degrades the bonding agent before vulcanization begins, resulting in adhesive-to-metal failure. Let coated inserts air-dry at room temperature.
Non-uniform curing in thick sections: Thick rubber cross-sections cure from the outside in. Heat penetrates slowly — so the center may not reach full cure when the outer surface has already vulcanized. This causes internal stress gradients that weaken the bond at the rubber-metal interface. Adjusting cure time based on maximum rubber thickness – not minimum – prevents this.
Bronze plating for difficult substrates: When standard bonding agents will not adhere to a specialty alloy or coated metal, bronze plating the insert first provides a consistent bonding surface. Primer bonds to bronze reliably, and bronze bonds metallurgically to the base metal.
📐 Application: Engine Mount Production
An automotive supplier produces EPDM engine mounts vulcanized to steel inserts. Steel inserts are grit-blasted, coated with a two-layer Chemlok system, and loaded into a transfer mold. At 340F for 15 minutes, the EPDM compound cross-links with the adhesive topcoat. Every mount is tested per ASTM D429 Method B – and must show 100% rubber tear. These mounts absorb engine vibration for 150,000+ miles without bond degradation. Identical processes apply to suspension bushings and vibration isolators across automotive applications, heavy equipment, and aerospace.
Testing Bond Strength, Durability, and Troubleshooting
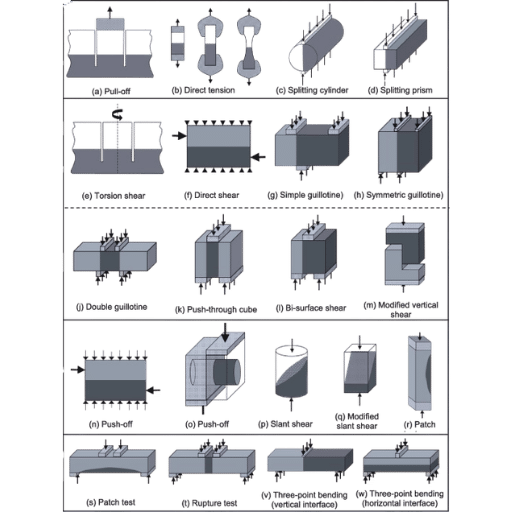
ASTM D429, “Standard Test Methods for Rubber Property – Adhesion to Rigid Substrates,” defines 8 test methods (A through H) for measuring rubber to metal bonding strength. Method B, the 90-degree peel strip test, is the most widely used in production quality control.
In Method B, a strip of vulcanized rubber bonded to a metal plate is peeled back at a constant rate while measuring the force required. A passing result means “100% rubber tear” – the rubber tears cohesively, leaving rubber residue on the metal surface. If the failure occurs at the adhesive-metal or adhesive-rubber interface, the bond is rejected.
For a detailed issue-by-issue breakdown of test methods and acceptable values by compound, see our bond strength reference chart.
Troubleshooting checklist when bonds fail testing:
- Check for adhesion failure modes: adhesive-to-metal (primer problem), adhesive-to-rubber (topcoat/compound mismatch) or rubber cohesive tear (pass)
- Check primer and adhesive film thickness using a dry film thickness indicator
- Assure that the mold temperature equilibrated to the specified minimum within all zones
- Remove any contamination on metal inserts prior to coating – test on sample sample for water break
- Consider adhesive shelf life and storage (most bonding agents are good for 6-12 months)
- Determine correct sulfur content and accelerator levels of the rubber compound
Frequently Asked Questions
Need Custom Rubber-to-Metal Bonded Parts?
Engelhardt produces vulcanized rubber-metal bonded parts in production volumes from 100 to 100,000+ per series.
Request a Quote for Custom Rubber-to-Metal Bonded Parts →
About This Guide
This rubber-to-metal bonding primer is derived from published engineering data, ASTM specifications, and experience in the manufacturing industry. Engelhardt specializes in molding engine covers for the automotive industry and moldings for industrial and heavy equipment. Our rubber-to-metal adhesives are checked by our engineering team for accuracy.
References & Sources
- Li, Y.et al. (2025). “Adhesion degradation of rubber-metal interfaces under cyclic corrosive loading”.npj Materials Degradation,Nature. nature.com/articles/s41529-025-00721-4
- ASTM D429-14. “Standard Test Methods for Rubber Property – Adhesion to Rigid Substrates.” ASTM International.
- ScienceDirect. “Vulcanization and rubber-to-metal bonding: process overview.” Elsevier.
- HM Royal. “Rubber Bonding Failure Analysis- Common Causes and Solutions.” hmroyal.com
- Parker Elastomer Process Materials “Rubber to Metal Bonding – Principles”. Parker Hannifin Corporation.
Related Articles