Get in Touch with Engelhardt


Rubber transfer molding is a closed-mold process in which a measured quantity of uncured rubber is forced from a transfer pot through runners into a heated cavity, producing flash-free parts with metal inserts in about 3 to 10 minutes per cycle. This guide covers the process physics, a six-dimension comparison against compression and injection molding, specific cost data, elastomer compatibility across five families, and a volume-based decision tree that shows when transfer molding wins — and when it doesn’t.
📐 Quick Specs: Rubber Transfer Molding
- Annual volume sweet spot — 5,000 to 50,000 parts
- Average cycle times – time per product of 3 to 10 minutes (compared with other forming processes injection molding 0.5-3 min, compression molding 5-15 min)
- Mold temperature — 150–180°C general, 170–200°C silicone
- 30. Dimensional tolerance – 0.10 mm (typical), 0.05 mm (with precision tooling)
- Typical cavity count — 4 to 30 per mold
- Tooling cost ratio – approximately 17% of injection mold (example: $6,500 transfer vs $38,000 injection)
- Recommended formetal inserted parts, tight tole-rance seals, thermosetting elastomers (EPDM, NBR, VMQ, FKM)
What Is Rubber Transfer Molding?

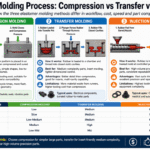
Rubber transfer molding—The originating Uncured rubber charges are pre-weighed in the Uncured rubber charger (trans feeder), then dropped into the transfer pot (loading chamber). From here the highly pressurized (via hydraulic plunger) uncured rubber charge is injected through the runner system into the heated mold cavities, where vulcanization takes place. (Compared to compression molding, where the uncured rubber charges are loaded directly into the cavity.).
The process exists just in between compression and injection in nearly everything: tooling cost, cycle time, tolerance and volumetric economics. It is that intermediate position that engineers automatically turn to it where compression alone can’t and injection’s $25,000-$50,000 tooling bill would not be economically viable at annual volumes.
What is transfer molding used for?
Transfer molding is mainly employed to manufacture rubber parts with an integral metal insert, i.e. rubber-to-metal bonded components, complex-geometry seals that require near-zero flash, and when injection tooling would be too large for the mid-volume quantities produced. Transfer molding dominates four industries: natural gas (face seals for gas valves), electrical (molded around spark-plug wire contacts), hydraulics (lip seals and U-cup seals with sharp edges), and aerospace (vibration-resistant bushings with bonded-metal cores).
How Rubber Transfer Molding Works (6-Step Process)

Rubber transfer molding is a process that blends the compression loading advantages and the pressure-driven flow of injection molding. This is what occurs from pre-form to final part:
- Pre-form preparation. Cured rubber in the form of a slug (“pre-form”) is weighed and shaped to fit all mold cavities plus the sprue system (typically 5-15% extra volume).
- Insert pre-form into transfer pot. Pre-form is loaded into transfer pot, a cavity filled with a cylinder as shown below, which sits on top of the cavity plate. With the mold closed under the press platen, the cycle begins.
- Plunger compression. A hydraulic plunger drops into the transfer pot, pushing down against the heated rubber, exerting a force of between 10 and 20 MPa and pumping the heated rubber through the sprue assembly to the cavities.
- Cavity filling. Molten rubber flows through runners into 4–30 cavities. A single pre-form can fill hundreds of small cavities when the runner layout is balanced.
- Vulcanization under heat and pressure. Holding the mold at 150–180°C for 3–8 minutes (longer for thick sections) while the thermoset elastomer cross-links into its final elastic form.
- Ejection and deflashing. Once the plunger retracts, the mold opens and finished parts eject. Any sprue pad and minor flash get shaved back – often the only post-machining needed.
📐 Engineering Note: Typical Transfer Molding Parameters
Mold temperature:150-180 C for general rubber;177-204 C (350-400 F) for liquid silicone rubber, 157-200 C (315-392F) for high-consistency rubber. Curing time is controlled by the part’s section size and the polymer manufacturer’s activator system – experimentally determined according to ASTM D5289 via a disk rheometer, not calculated from elementary physics. Transfer force is usually 10-20 MPa; plunger force is a function of press size (50-200+ MT). Vent technology must be tailored to the molar volume of the compound: vents too weak encourage trapping during stiff compounds, vents too strong produce flash with fluid compounds.
How long does the transfer molding process take?
A full transfer cycle – load-close-transfer-cure-eject – takes 3-10 minutes for most technical rubber parts, with thickest-walled (>10mm wall thickness) stretching to 15 minutes and thinnest-seals reducing to 90-120 seconds. Faster than compression molding (5-15 min) because heat is transferred from the extruded rubber when pushed through the sprue system, slower than rubber injection molding (0.5-3 min) because the pre-form has to be manually measured and reloaded. For context, high pressure resin transfer molding (HP-RTM) used in parts like automotive door panels takes 1-5 min per cycle versus 30-60 min for the old-school liquid process.
Transfer Molding vs Compression Molding vs Injection Molding: The Decision Matrix

Any rubber part feasible with transfer molding can also – hypothetically – be compression molded or injection molded, the question being which costs the least per good part at your designated volume. Below is a table that converts typical performance tradeoffs into real economic figures.
| Dimension | Compression | Transfer | Injection |
|---|---|---|---|
| Tooling cost (mid-complexity) | $2,000–$8,000 | $6,500–$15,000 | $25,000–$50,000+ |
| Cycle time | 5–15 min | 3–10 min | 0.5–3 min |
| Dimensional tolerance | ±0.20 mm | ±0.10 mm (±0.05 mm precision) | ±0.05 mm |
| Flash | Heavy — deflash required | Minimal — often ship-ready | Near-zero |
| Metal inserts | Difficult — inserts shift | Native capability | Possible but complex |
| Volume sweet spot | <5,000 parts/year | 5,000–50,000 parts/year | >100,000 parts/year |
These numbers are important because the processes not just overlap; at certain batch sizes one process actually “wins” as the most cost effective. Below 5,000 parts/year, the amortized tooling costs of $2K-$8K for compression (even accounting for post-machining time) outperform transfer because of its long cycle time. At 100,000 parts and above, the much shorter cycle time of injection ($25K+ tooling premium) makes the cost per part so low that the extra tooling price is insignificant in weeks. The chasm in the middle 5K-50K, where we have a lot of rubber post-machining times but too few parts/month for injection, seems underpopulated and hence promising for transfer’s particular advantages.
The 5-30-50 Rule for Transfer Molding’s Sweet Spot
From each manufacturer’s procurement communication, there is indeed a simple rule of thumb for when transfer becomes the optimal process. Without exception, select transfer molding if all three of these conditions are fulfilled:
- Assuming 12 working months per year, 5,000+ parts/year gives amortized tooling spent of at least $6.5K, but not a hike high that you should stare at the money and scrap until you can afford injection
- Thirty or fewer cavities – the maximum number such that the runner pressure will distribute evenly and the process won’t devolve into unbalanced runner banks
- 50 cm shot volume or less – the maximum volume such that a single pre-form can fill all cavities normally without requiring a thermal dwell time (which would drive compression into the thousands of dollars per tool range).
When any two of these three parameters are exceeded – case in point, 200,000 parts/year and 60 cavities – the 5-30-50 Rule says move to rubber injection molding. When all three parameters are exceeded, compression mold often becomes cost better. While not infallible, this rule seems to encompass roughly 80% of real RFQ scenarios in practice.
Which is better: transfer molding or injection molding?
Transfer molding wins if Part volume is lower than ~50,000/year AND the part has metal inserts/needs sharp edges (lip seals, U-cups). Injection molding wins at production runs of higher than ~100,000/y with simple geometry and no metal inserts; “middle ground” volume should be plugged into a total cost of ownership equation: injection’s 1-minute cycle@4 times the throughput eats the $25K tool premium within a few thousand parts, so you always should expect a procurement engineer to be running an apples-to-apples cost-per-shot equation instead of guesstimating on “high vs low volume”. The H&H Molds analysis team says “cost per shot amortized over remaining volume is what drives” this decision, not “the initial tool cost”.
Advantages and Limitations of Rubber Transfer Molding

A honest break down of advantages and disadvantages can be more instructive than a list of features because transfer molding’s weaknesses are predictable and the wins are geometry- and volume-specific rather than universally applicable.
✔ Advantages
- Near-zero flash on well-vented tooling — parts often ship-ready
- Native metal insert capability (rubber-to-metal bonding)
- Sharper edges and tighter tolerances than compression molding
- Shorter cycle times than compression (3-10 min vs 5-15 min)
- Tooling 60-85% cheaper than injection molds for the same part family
- Single pre-form fills multiple cavities, simplifying prep
⚠️ Limitations
- Slower than injection molding (3–10 min vs 0.5–3 min)
- Sprue and pot residue is unrecoverable waste (thermoset scrap)
- Insert tooling requires more maintenance — daily reset common
- Poor economics above ~100,000 parts/year
- Requires strict process control on temperature and plunger force
- Thin-walled parts (<1 mm) can trap air if venting is marginal
Common Mistake:”Transfer molding is always cheaper than injection.”
This breaks down fast. When production exceeds ~100,000 parts/year, injection: 0.5-3 minute cycle time eliminates per-part press/hour/cost advantage of transfer within the first year of production; don’t even mention upfront tooling costs to the purchasing department. Use cost-per-shot first.
When to Choose Transfer Molding: A Decision Framework

Equipment selection is not one variable for rubber parts. Here’s the process selection flowchart by priority order:
📋 Rubber Molding Process Decision Tree
- Does the part require metal inserts or bonded metal features?
→ Yes → Transfer molding is almost always the right answer. Compression can’t hold insert position; injection insert tooling is 2–3× the cost. - What is annual production volume?
→ <5,000 parts/year → Compression molding (lowest total cost when cycle time isn’t critical)
5,000-50,000 Parts/year Transfer molding (the 5-30-50 Rule!!!)
50,000-100,000 Parts/year If the volume is consistent and high, compare injection against transfer; otherwise run a cost-per-shot model on either, often transfer or injection.
>100,000 Parts/year compare injection against compression in the process selection flow diagram. - What tolerance does the part require?
→ Looser than ±0.20 mm → Compression is fine
0.05 to 0.20 mm Tolerance in manufacturing process: transfer with precision tooling
Tolerance better than 0.05 mm use injection or transfer with in-process measurement - Is flash acceptable, or does the part need to ship as-molded?
→ Deflashing is acceptable → Compression stays viable
Delivery without flash transfer or injection (transfer can beat injection below 50K/year here)
Two questions: “Are there metal inserts?” and “What’s the annual volume?” usually crack the answer to RFQ pre-screening in under 30 seconds. Engelhardt’s rubber transfer molding services can deliver a DFM review and tooling quote in two working days, with dual-base production (China and Thailand) to minimize tariffs for US and EU buyers.
Materials and Applications: Elastomer Compatibility for Transfer Molding

Transfer molding works with almost every thermoset elastomer, and the majority of thermoset plastics (epoxy, phenolic). Choosing the right material affects all of the others aspects in the process – mold temperature, cure time, tolerance stability, part life – and determining the alloy type is generally the first discussion the design engineer has with the molder. ASTM D1418 nomenclature defines the different classes of elastomers, and ASTM D2000 grade/type/class specifications for automotive grade rubber products.
Five compounds depicted here are predominantly used across industrial transfer molding applications.
| Compound | Temp Range | Chemical Resistance | Typical Transfer-Molded Application |
|---|---|---|---|
| EPDM | -45 to +150°C | Excellent: water, glycol brake fluids, steam. Poor: oils, fuels | Water-system seals, weatherstrip, glycol brake diaphragms |
| NBR (Nitrile) | -30 to +100°C | Excellent: petroleum oils, hydraulic fluids, fuels. Poor: ozone, sunlight | Oil seals, fuel system O-rings, hydraulic lip seals |
| VMQ (Silicone) | -55 to +230°C | Broad: oxidation, ozone, many chemicals. Poor: steam, concentrated acids | Medical device handles, food-contact seals, high-temp gaskets |
| FKM (Fluoroelastomer) | -20 to +200°C | Outstanding: fuels, chemicals, high-temp oils. Moderate: steam | Chemical process seals, aerospace fuel seals, downhole gaskets |
| CR (Neoprene) | -40 to +120°C | Good: weather, ozone, moderate oils. Poor: strong acids | Refrigeration gaskets, bridge bearing pads, vibration mounts |
One quirk, seldom noted in process and troubleshooting guides: both LSR and HCR (high-consistency rubber) are “silicone” on their datasheet, but run at different mold temps (177-204 vs 157-200 C) and cure chemistries. Ongoing molding performance of HCR tooling can’t simply be transferred over into an LSR cycle without adjustments to the thermal profile—a surprisingly new fact for many first-time silicone customers. For complicated rubber parts with embedded metal features, rubber-to-metal bonding occurs in the transfer molding cycle itself, by priming the metal insert in an adhesion promotion solution before loading it into the cavity—bypassing the secondary bonding step that compression requires.
“Whenever a part specification requires transfer molding with metal inserts, the first question asked by our managers in the purchasing department is not about volume or the tolerance, but about the adhesion primer desired by the customer on insert surface. That one answer will determine cycle time, reject rate, and IF the part will make it through vibration testing. We are often sent tolerance drawings without the primer specified, and we quote giving ourselves more room until we get that answer.”

Industry guides seldom assign dollar values to rubber transfer molding costs because all of the factors—part geometry, number of cavities, compound, cavity coating, insert detail—defeat averaging. There is enough published information, however, to develop a credible cost model, and the value is important because purchasing teams quoting transfer molding against injection molding are operating with faulty assumptions that ‘transfer is always less expensive.’
| Cost Line Item | Transfer Molding | Notes |
|---|---|---|
| Tooling (mid-complexity) | $6,500–$15,000 | Example: H&H Molds reports a typical $6,500 transfer mold vs $38,000 injection mold |
| Rework / modification budget | $2,000–$8,000 | Reasonable contingency for cavity tuning after first article |
| Requalification / sampling | $2,400+ (30 hrs × $80/hr) | Internal engineering time for PPAP-grade sampling |
| Per-part cost driver | Press-hours ÷ cavity count | Cycle time × shots-per-hour × labor rate, divided by good parts |
| Realistic total (tooling + rework + qual) | ~$14,500 on a $6,500 base | The “cheap mold” is rarely the final number |
Lead time moves on similar trends: nominal mold delivery is available at 3-4 wks (but the ‘real-world’ window from PO to first-article approval is a fair bit longer – 6-10 wks once you factor in DFM review, sampling and dimensional qualification), though behind the scenes US and European buyers working with Asian vendors can look to facilitate a dual-base production (China tooling + Thailand molding, or the other way round) which would save you 15-25% duty on imported components of some Harmonized Tariff Schedule codes without adding to the lead time – a very specific type of cost-saving lever those that have global single-country supply chain capabilities can’t. To get a transfer molding quote where both production locations are priced up front, most molders ask for the part drawing, annual volume, and target material grade before quoting.
Is rubber transfer molding more precise than compression molding?
Answer
Yes, by roughly one tolerance class. Transfer molding holds ±0.10 mm with standard tooling and ±0.05 mm with precision tooling; compression molding runs closer to ±0.20 mm. For features tighter than ±0.05 mm, neither process wins — specify injection molding or plan a secondary machining step.
What’s the difference between transfer molding and resin transfer molding (RTM)?
Answer
Resin transfer molding (RTM) is a composite process in which liquid thermoset resin is injected into a closed mold containing dry reinforcement, usually simply glass or carbon fiber. It is used to make fiber-reinforced composite parts, not pure rubber products. Conventional RTM tooling runs between about 30-60 minutes per cycle; high pressure variants used in automotive composites can use injection cycles of 1-5 min. Rubber transfer molding does not involve fiber reinforcement, and necessarily involves vulcanized rubber, but it is conceptually related process: used to process pre-compounded uncured elastomer into finished parts of solid rubber or bonded rubber and metal components. It’s just the same verb used in two different corners of manufacturing.
How durable are transfer molded rubber products?
Answer
All durability results reported are for the compound used, not the processing technique. A transfer-molded EPDM part used for water-system seal applications sustained 15-25 years service; the same concept used in outdoors NBR applications fractured in 2 years from ozone attack. Smilarly, the process itself has marginally better dimensional stability and flash control than compression molding, leading to greater consistency in sealing surfaces and extended service life as a gasket in fluid applications. If your application involves elevated temperatures or aggressive chemicals, FKM or VMQ compounds are the recommended choice independent of molding technology. Choose the part materials first, then the process second.
Can transfer molding handle metal inserts?
Answer
Yes – in fact this is almost the sole benefit of transfer molding over compression. Metal inserts are loaded into the cavity die prior to the closing of the mold, and the rubber transfers around the insert under pressure forming a minimal mechanical joint. Typical applications include shock mounts, drive-system bushings, face seals, and electrical connector seals where a metal electrical terminal is being formed into the rubber body. The surface of the insert is typically pre-treated with a chemical primer such as Chemlok or Megum to establish a rubber-to-metal bond in the presence of vibration and thermal cycling. Learn more about insert and over-molding capabilities for bonded parts.
What’s the minimum order quantity for custom transfer molded parts?
Answer
Minimum order quantities in transfer molding are driven by tooling amortization, not by per-run economics. Once tooling is paid for, most molders accept orders of 500–2,000 pieces per release and some will run smaller trial batches of 100–250 pieces during first-article approval for qualification samples. However, MOQ is rarely the right question to ask first. The more important decision is whether tooling investment is justified at your expected annual volume — if total annual demand across the tool’s life will stay under roughly 2,000 parts, compression molding almost always produces a lower total cost per part than transfer molding, even with slightly worse tolerances and more deflashing labor. For annual volumes above 5,000 parts with metal inserts or sharp-edge features, transfer molding’s MOQ flexibility becomes a genuine economic advantage, particularly compared with injection molding’s larger minimum order size driven by cavity count. Procurement teams should always run a per-part cost model including tooling amortization, press-hour cost, deflashing labor, and scrap rate before committing to a process — the MOQ number alone rarely tells the full story of total landed cost.
📐 Ready to quote a transfer-molded part?
Once the drawing is sent, Engelhardt’s engineering team can provide a DFM review, material suggestion and tooling quote within 48 hours. Your China/Thailand dual-base production will be priced side-by-side for tariff-sensitive buyers.
Upload Drawing – Even PRice within 48 hours | Download Transfer Molding Process Datasheet
A word on sources: the figures on cost and tooling dollar ranges in this guide originate from published industry references such as H & H Molds, elastomer handbooks, etc. They are typical examples and do not reflect averages, actual quotes depend on part complexity, number of cavities, material, and local labor cost. When we indicate ranges, it is for decision considerations, do not hesitate to request for a test quote in case of project based on your drawing.
This article has been written by a group of engineers at Engelhardt and cross-checked with ASTM D 1418, ASTM D 2000 and ASTM D 5289,
References & Sources
- ASTM D2000-18: Standard Classification System for Rubber Products in Automotive Applications — ASTM International
- ASTM D1418-17: Standard Practice for Rubber and Rubber Latices—Nomenclature — ASTM International
- ASTM D5289: Standard Test Method for Rubber Property—Vulcanization Using Rotorless Cure Meters — ASTM International
- New Tool vs Injection Mold Transfer — Cost Analysis — H&H Molds
- Procedures for Curing Silicone — Mosites Rubber Company Technical Resources
- Elastomer Chemical Compatibility Guide — Gulf Rubber (PDF)
- Molding Defects and How to Fix Them: Understanding Mold Flash — Nitrofreeze Cryogenic Solutions