Get in Touch with Engelhardt


Quick Specs: The Three Rubber Molding Methods
| Cure temperature | 160–180°C across all three (170–180°C for SR/FR) |
| Mold pressure | 50–200 bar (1,000–4,000 psi) for compression; higher for injection |
| Cycle time | Compression 1–6 min · Transfer 1–4 min · Injection (LSR) 10–90 sec |
| Tooling cost (entry) | Compression $1k+ · Transfer ~$3k+ · Injection $5k–$100k+ |
| Best volume range | Compression <50k/yr · Transfer 1k–20k · Injection 50k–1M+ |
| Standard tolerance | RMA A3 (commercial) most common · A2 with precision tooling · A1 only with fine-tuned injection |
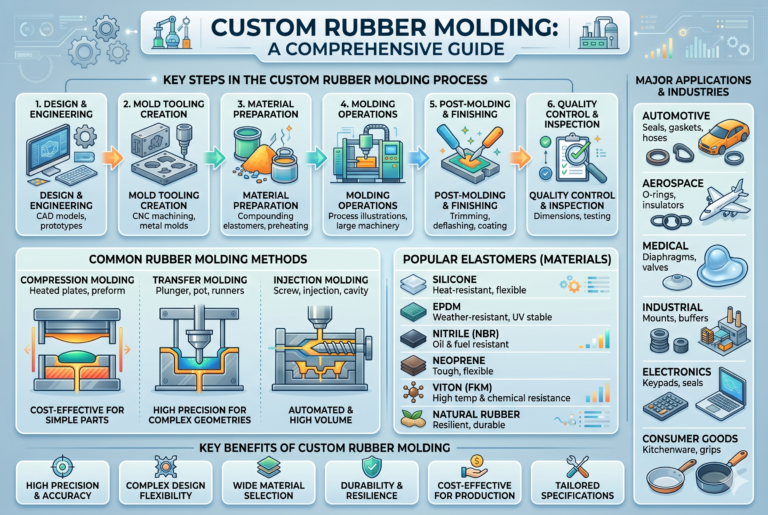
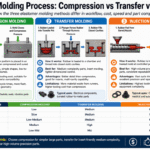
1. Quick Comparison: Compression vs Transfer vs Injection at a Glance

All three processes begin with the same chemistry – vulcanization is pressure- and temperature-induced cross-linking of rubber through a heated mold cavity – but they use different ways of doing so, with different costs and timing. Here are the core engineering trade-offs that matter most to a purchasing person in a side-by-side comparison.
| Attribute | Compression | Transfer | Injection |
|---|---|---|---|
| Material loaded as | Pre-cut preform | Preform in pot, plunger forces it | Heated barrel, screw injects |
| Tooling cost (entry) | $1,000–$30,000+ | $3,000–$30,000+ | $5,000–$100,000+ |
| Cycle time | 3–8 min | 1–4 min | 30–90 sec (LSR) |
| Material waste | Low (flash trim) | Higher (cull/sprue pad) | Medium (runner/sprue) |
| Tolerance class (RMA) | A3–A4 typical | A2–A3 | A1–A2 achievable |
| Insert handling | Risky (high local pressure) | Excellent | Excellent (LSR overmold) |
| Volume sweet spot | <50k parts/yr | 1k–20k parts/yr | 50k–1M+ parts/yr |
| Best for | Large simple seals, gaskets, prototypes | Insert/overmold parts, small precision seals | High-volume O-rings, LSR medical, electronics seals |
💡 The 1–3–5 Tooling Rule
Use this as a bench mark when a quote arrives: a basic compression tool starts around $1k, a comparable transfer tool starts near $3k, and a comparable rubber injection tool starts near $5k and climbs fast with cavities and complexity. That’s the easy part; the volume crossover is where most projects choose the wrong process.
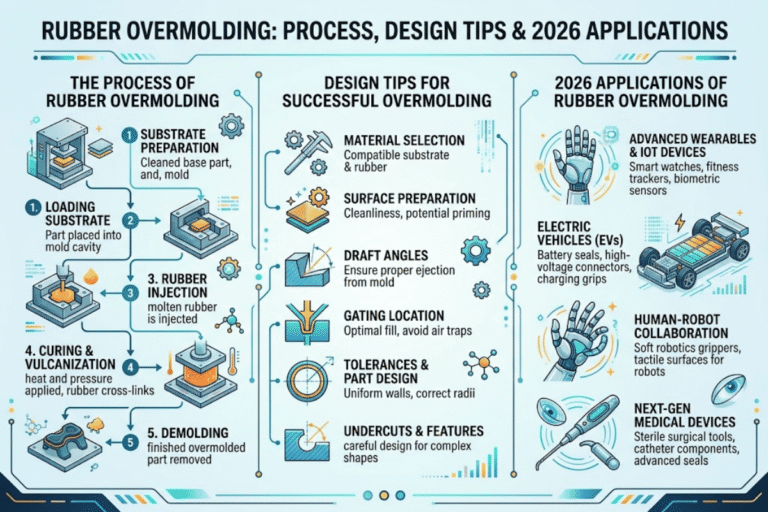
2. Compression Molding: When Simplicity Wins

Compression molding is by far the most mature of these rubber molding methods and the cheapest process for low-to-medium volume work. In this process a measured rubber preform is placed directly in an open, heated mold cavity. A mold then closes, vulcanizing the elastomer through heat and pressure, before opening again and ejecting the part. No runners, no sprues, and no injection screw – which is exactly why tooling is so inexpensive.
What is rubber compression molding?
Rubber compression molding is a thermoset shaping process where a heated mold cavity cures an elastomer preform under direct pressure, typically at 160–180°C and 50–200 bar (1,000–4,000 psi). In the typical rate of vulcanization, the cross-linking of polymer chains sets the shape. Time to complete depends on wall thickness, formulation, and the shape of the cavity, but most parts under 10 mm average depth cure in 3-8 minutes per shot. For thicker parts, it can take 10-20 minutes – a stochastic limit that injection molding can avoid.
📐 Engineering Note
Engelhardt’s compression cells take 3-8 minutes to cross-link most parts with less than 10 mm wall thickness when the mold is held at about 170C. Pressure is set for each formulation based on its hardness – softer EPDM (50-60 Shore A) responds well to lower charge pressures; harder NBR (70-80 Shore A) needs the upper end of the 1-4 Mpa range. The Wikipedia entry on vulcanization covers the underlying sulfur cross-linking chemistry.
✔ Advantages
- Lowest tooling investment of the three rubber molding methods
- Minimal material waste — no runners, only flash trim
- Handles large parts and thick cross-sections that injection cannot
- Fast tooling lead time, best suited for prototypes and short runs
- Forgiving on high-viscosity and high-hardness compounds
⚠ Limitations
- Long cycle times make economical production impossible over ~50,000 units/yr
- Tolerance class typically capped at RMA A3 (commercial)
- Inserts are dangerous – high peak pressure and high motion can cause delicate metal pins to shift or crack
- Manual flash removal adds labor and inspection time
- Less repeatable than injection on cosmetically critical surfaces
For a detailed process overview, Engelhardt’s rubber compression molding service page describes the tonnage and platen size calculations in depth and the compression molding cost estimator gives you a defendable budget figure before you approach a buyer.
3. Transfer Molding: The Bridge Process
Transfer molding bridging compression and injection in cycle time, tooling cost, cavity pressure and tolerance class. A rubber preform sits in a transfer pot above the mold; a plunger pushes the heated material down sprues into closed mold cavities, where it cures. Because the cavities close before the rubber arrives, transfer molding can be used for inserts and very delicate thin cross-sections that compression cannot work safely.
When should I choose transfer molding over compression?
Transfer molding is ideal where a part requires a sensitive metal insert, electrical pin, or multi-material seal in volumes too low to support an injection tool. Typical is a “floating” composite seal where rubber bonds around a metal ring. Apple Rubber’s transfer molding analysis sets out that the lower injection pressure protects sensitive inserts; others online agree. Advantage volume range: 1,000 – 20,000 parts per year.
⚠️ Common Mistake — The Waste Myth
Many assume transfer molding wastes less scrap than compression because the process looks tighter, more “controlled.” In fact, if material costs are more important than scrap reductions, industry sources tell me transfer pots produce greater waste volumes than excessive sprue from compression tools; the residual cull pad in the sprue is non-recyclable (rubber is thermoset). Thus, where material cost dominates, a larger-sized compression process will be lower waste than a smaller transfer clamp. This is one of the few examples where the visually “tidier” process actually wastes more.
Transfer molding is especially suited to rubber-to-metal bonding because the preheated insert sits in a closed cavity while the elastomer flows around it. Engelhardt’s rubber transfer molding capabilities are routinely specified for these hybrid parts.
4. Injection Molding: When Speed and Repeatability Pay Back

Injection molding in rubber is unique among the three processes in being built exclusively to support high-volume production throughput. A screw that is heated and driven by a barrel plasticizes the material — whether it is hard rubber (HCR) or silicone (LSR) — and injects each rubber part into a number of cavities through a runner system. Cycle times are quick, automation is high, and scale-up easily to parts of hundreds of thousands per year. The downside is the processing expense: it is far more capital-intensive than compression and down-black runs run the risk of $5,000 to $100,000+ tooling costs.
HCR vs LSR: Two Worlds Inside One Process
HCR injection molding fed with solid rubber compounds : EPDM, NBR, natural rubber, FKM, in strip form, etc. Runs 1-3 minute cycles. Parts provides with little flash through the fully closed cavity. LSR injection molding fed with two component liquid silicone, metered through static mixer head. Cycles drop to 10 to 90 seconds depending on wall thickness and product size. The production is clean enough for ISO 13485 Class 7 cleanrooms. And the part is precisely repeatable and material very biocompatible – possible driven by LSR’s dominance in medical, baby care and food grade applications
How tight can tolerances be in rubber injection molding?
Injection molding gets you to RMA A1 (high accuracy) if you have the right geometry, but most production parts stay at A2 (accuracy) or A3 (supermarket commercial). Overall RMA tolerance tables set A1 fixed dimensional accuracy at ±0.004 mm for the smallest features (0-0.4 mm range) versus 0.008 mm for A3. Gain-A1 is machined molds, very tight process control, and normally a part without rapidly varying wall thicknesses. For material selection, the rubber material durometer guide is a good starting point.
“LSR injection molding is perfect for medical cleanroom production because all the cycles are the same, and that reproducibility lets us verify the process under ISO 13485 rather than struggling with batch-to-batch variation.”
That LSR cycle time target is really worth thinking about: a 30-90 second LSR shot against a 3-8 minute compression shot is a 6-10x throughput factor for the same part footprint. If you expect 200,000 LSR seals a year, no amount of compression press capacity will catch up. Engelhardt’s rubber injection molding line covers HCR and LSR in one location, with a separate silicone vs rubber decision article for materials selection upstream of process choice.
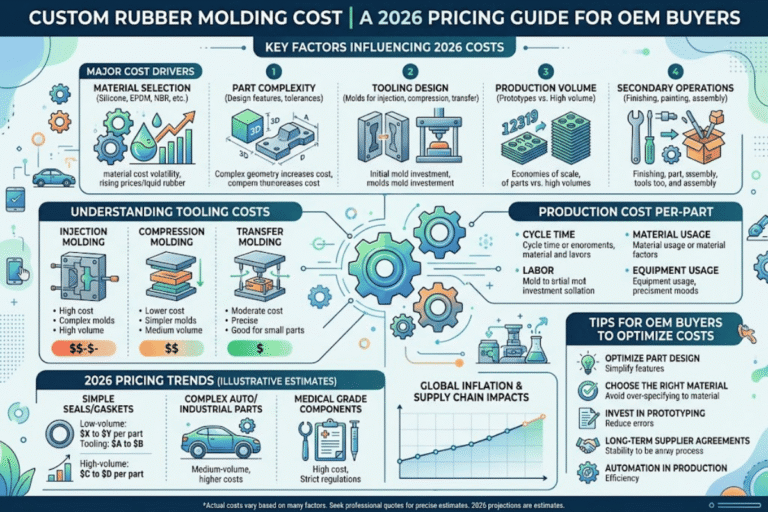
5. The Cost Equation: Tooling, Cycle Time, Material Waste

The overall cost of a rubber molding program is not the tool. It is the tool iteslf plus the per-part cycle cost through the program lifetime. Cheap tooling on a process with long cycles costs way more than costly tooling on a process with short cycles once volume demand grows. Break-even volume for the math to flip is the single most influential figure in choosing one process over the other.
| Cost driver | Compression | Transfer | Injection |
|---|---|---|---|
| Tool cost (entry) | $1,000–$30,000+ | $3,000–$30,000+ | $5,000–$100,000+ |
| Tool lead time | 2–4 weeks | 3–6 weeks | 5–10 weeks |
| Cycle (typical) | 3–8 min | 1–4 min | 30 sec–3 min |
| Scrap (% of shot) | 3–8% | 8–15% | 5–10% |
| Break-even vs compression | Baseline | ~5k–20k parts/yr | ~50k–100k parts/yr |
This 50,000 to 100,000 part intervention point is really interesting to point out. Jiga’s compression vs injection molding analysis shows that it is no worse than about 50,000 to 100,000 parts to beat cheapest in-house compression by injection molds – much closer to the 5,000 part number often seen in marketing copy. Formlabs’ injection molding cost estimator walks through the tooling math in more detail.
Break-Even Formula
Annual volume (per part reduction in labor time) Tooling delta upgrade to the faster process.
Example: switch from compression to injection saves $0.40/part in cycle/labor cost; the injection tool $25,000 more than the compression tool. Crossover = 25,000/.40=62,500 parts. Annual volume below that, total cost goes to compression; above it, the injection pays back the tool in a year one.
For a working number on your specific geometry, the rubber injection mold tooling cost estimator and the compression molding cost estimator will get you within ballpark before you commit to a process.
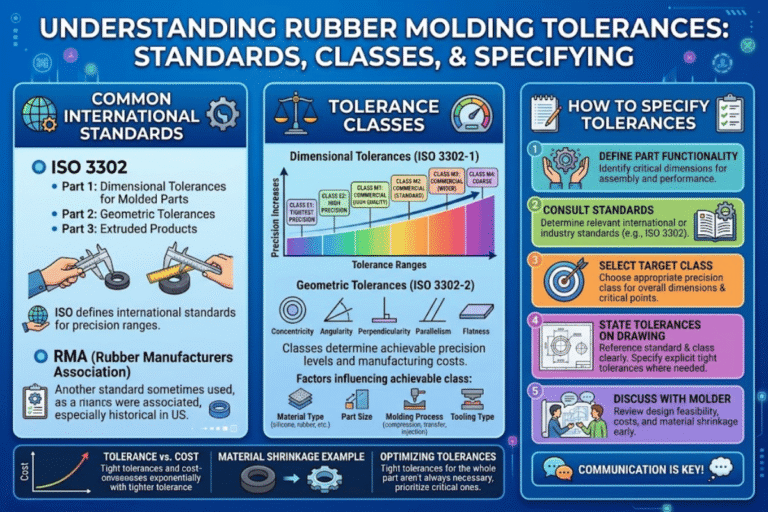
6. Tolerance, Surface Finish, and Quality Trade-offs

The biggest difference among the three rubber molding options is in the tolerance. The Rubber Manufacturers Association MO-1 (2015) standard defines four classes for molded rubber components; not every process will be able to attain each one. Affinity to a particular class has little to do with marketing claims and a lot to do with the amount of cavity pressure and cavity maintenance discipline the process demands.
| RMA class | Use case | Fixed tol. (0–0.4 mm) | Achievable in |
|---|---|---|---|
| A1 — High precision | Aerospace, medical, safety-critical seals | ±0.004 mm | Injection only (with fine-tuned mold) |
| A2 — Precision | Hydraulic seals, automotive components | ±0.006 mm | Injection & well-built transfer |
| A3 — Commercial | Most industrial & consumer parts | ±0.008 mm | All three methods |
| A4 — Basic | Cost-driven, non-critical fit | ±0.013 mm | Compression default |
Why do injection molds cost more than compression molds?
Three reasons rooted in mold design. First, an injection mold has to house a runner assembly, runners, gates, and cooling circuits that a compression mold misses. Second, the injection cavity itself is machined to tighter dimensional tolerances the part will inherit. Third, the steel alloy used in production injection molds are kept to a higher surface polish to be ready for a million cycle run without surface degradation. Result: a tool can be 2x-to-10xthe price of a compression counterpart – and the math works only at volumes above the crossover point.
- ✔
Check flash volume after 25 shots before approving a new compression mold – flash that goes away after 100 cycles is a symptom of an under-toned press, not a bad cavity - ✔
Check cavity venting before chasing your tolerance. trapped air mimics dimensional variations and is one of the most common false alarms in transfer molding - ✔
Check out at least 3 shots across a single cycle from a cold-start news if you will use a high consistency rubber process. Check your dimensions against the water-cooled steady state in production.
For dimensional planning, the injection molding tolerance calculator handles the geometry math, and the elastomer compound selector matches the compound to the chemical and temperature environment.
7. Selection Decision Framework: Match Process to Project

Use the weighing machine as a sanity check, not the oracle. Conduct your part number through the three questions in order. Whichever process comes out is the correct initial starting place when quoting, because material constraints will sometimes dominate volume constraints, and good rubber partners will certainly tell you when that is the case.
Three-Question Decision Tree
- Planned volume? Less than 50,000 parts compression or transfer. More than 100,000 injection (HCR or LSR). Between 50,000 and 100,000 and let the cycle time and tolerance decide.
- Overmolding or inserts? Yes → transfer or injection. No → compression.
- What class of dimension is required?A1 only available injection. A2 available injection or transfer. A3/A4 any of the three.
Six typical rubber component archetypes mapped to their lowest total cost rubber process – the answer a savvy purchasing engineer would arrive at after runnign the numbers.
| Part archetype | Recommended process | Why |
|---|---|---|
| Large industrial seal (200+ mm) | Compression | Injection cavity cost untenable; compression handles thick walls |
| Vibration mount with bonded steel | Transfer | Insert protection at moderate volume, A2 tolerance |
| Standard NBR O-ring (millions/yr) | Injection (HCR) | Volume crushes per-part economics; multi-cavity tools amortize |
| LSR medical valve | Injection (LSR) | Cleanroom, biocompatibility, 30–90 sec cycles |
| EPDM gasket prototype (50 pcs) | Compression | Lowest tooling cost & fastest lead time wins |
| Sensor housing with electrical pins | Transfer | Pin survival at A2 tolerance, reasonable tool cost |
Use the molding process comparison matrix on Engelhardt’s website to find an interactive version of the decision logic below. Enter volume, insert needs and tolerance class to get a process recommendation (rough tooling and cycle estimates).
8. FAQ
Q: What’s the main difference between compression and injection molding for rubber?
View Answer
Compression molding loads a pre-cut rubber preform directly into an open heated cavity and cures it under press pressure. Injection molding plasticizes the rubber inside a heated barrel and forces it into a closed multi-cavity tool through a runner system. Injection cycles run 5 to 10 times faster, but tooling typically costs 2 to 10 times more.
Q: Which rubber molding method is cheapest for low-volume parts?
View Answer
Compression molding wins on low volume. Tooling starts near $1,000 and lead times sit at 2 to 4 weeks, which is unbeatable for prototypes and short runs under 50,000 parts per year. Per-part labor is higher than injection, but the math only flips once annual volume crosses the 50,000 to 100,000 part break-even.
Q: Can transfer molding handle metal inserts better than compression?
View Answer
Yes. Transfer molding closes the cavity before the rubber arrives, so the insert is shielded from the high local pressure that compression molding would apply directly to it. That is why transfer remains the default choice for vibration mounts with bonded armatures and for sensor housings carrying delicate electrical pins.
Q: What is the typical vulcanization temperature for rubber injection molding?
View Answer
Most rubber compounds cure between 160°C and 180°C in injection. Silicone rubber and fluorine rubber sit at the high end of that window (170 to 180°C); EPDM, NBR, butyl, and natural rubber cure cleanly anywhere across the 160 to 180°C range. An upper ceiling for this manufacturing process sits around 200°C high temperature, beyond which scorch becomes a problem.
Q: How tight can rubber molding tolerances be (RMA classes)?
View Answer
RMA MO-1 defines four tolerance classes: A1 (high precision, ±0.004 mm at the 0 to 0.4 mm dimension range), A2 (precision, ±0.006 mm), A3 (commercial, ±0.008 mm — the most common spec), and A4 (basic, ±0.013 mm). Injection can hit A1 with the right tooling; transfer reaches A2; compression typically lives at A3 or A4.
Q: Is LSR only molded by injection?
View Answer
In practice, yes. Liquid silicone rubber is metered as a two-part liquid through a static mixer and pumped into a closed mold — that flow is fundamentally injection. HCR (high-consistency silicone rubber) can be compression molded, but LSR’s biocompatibility, fast cycles in the 10 to 90 second range, and cleanroom compatibility are exactly why it exists, and all three benefits depend on the injection process.
About This Comparison
Engelhardt runs compression, transfer, and injection rubber molding lines under one ISO 9001 and IATF 16949 quality system. Cost ranges, RMA tolerance classes, and break-even numbers in this guide are pulled from public industry standards and 2024 to 2026 supplier benchmarks — not internal Engelhardt pricing — so the math holds even if your eventual supplier is someone else. Reviewed by the Engelhardt molding engineering team.
References & Sources
- RMA MO-1 (2015): Classes and Tolerances for Molded Rubber Products — Rubber Manufacturers Association
- RMA Tolerances Tables — Vicone (RMA-aligned reference)
- Vulcanization — Wikipedia (sulfur cross-linking chemistry overview)
- Multi-Component Injection Molding with LSR and ABS for Medical Technology — PMC NCBI peer-reviewed study
- Vulcanization Temperature of Various Rubber Materials — Niceone-Tech industry reference
- Compression Molding vs Injection Molding: Key Differences and When to Use Each — Jiga (cost & break-even data)
- How to Estimate Injection Molding Cost — Formlabs
- Transfer Molding: Advantages and Disadvantages — Apple Rubber
- Liquid Silicone Rubber (LSR) Injection Molding for Medical — Trelleborg Medical